Are you looking for an easy way to paint a ceiling fan without removal? You’re in the right place!
In this blog, I’m going to show you how to paint your ceiling fan with minimal effort and without taking it down. Let me show you an easy way to paint your ceiling fan without removing it.
Paint your ceiling fan without removal
Let’s face it: replacing a ceiling fan can be costly and time-consuming. But what if I told you that there was a quick and easy way to paint your ceiling fan without removal?
Not only does painting your ceiling fan save money, but it also allows you to unleash your creativity, ensuring the fan complements your room’s aesthetic perfectly.
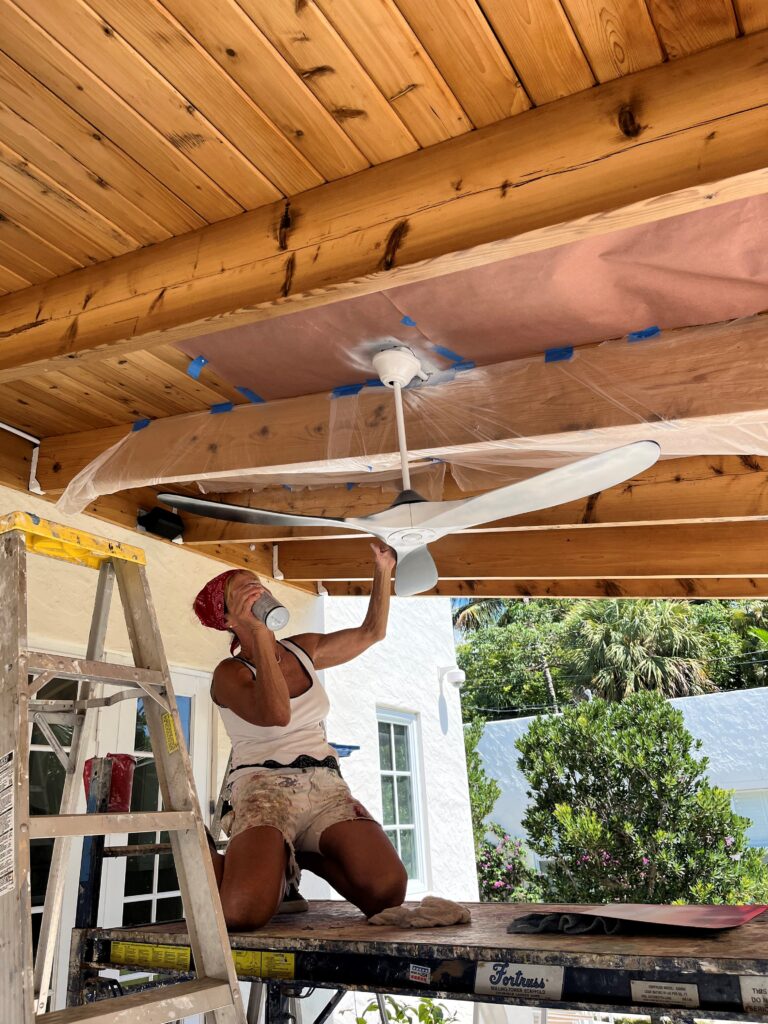
Our goal is to transform this ceiling white to to blend into the white wash ceiling we are about to create. But the black ceiling fans are going to stick out like a sore thumb so we decided to paint them. Hiring an electrician to remove them and then reinstall them would be an unnecessary expense and extra hassle.
So to save time and money we decided to paint them while they were still hanging on the ceiling. Genius, right?
Step-by-Step Guide to Paint a Ceiling Fan Without Removal
- Prep Your Workspace: Before you start spraying tape plastic to the ceiling about 2-3 feet out from the ceiling fan, this will keep the over-sprayed paint from getting on the ceiling.
- Clean Wipe down the blades with a damp cloth to remove dust and allow them to dry completely.
- Prime Apply 2- thin coats of spray primer to the blades. Allow the primer to dry as recommended on the can, usually about 20 minutes.
- Paint Once the primer is dry, it’s time to bring in color. Spray your chosen paint in thin, even coats, allowing each coat to dry before applying the next. We used High Heat Rust-oleum spray paint. Be patient; multiple light coats will yield a smoother finish than one heavy coat.
Note: Remove the blades if possible. It will be easier to paint them. In this case, the blade where not detachable.
There you have it—an easy, cost-effective way to paint your ceiling fan without the fuss of removing it.
Remember, every little improvement counts when making your home a beautiful and functional place to live. Ready, set, paint!
If you’re thinking about turning your hobby into a side hustle, join the Empowering Women coaching group where we dive deep into building a creative business and making money doing what you love.
P.S. Make sure you don’t miss out on signing up for my blog, filled to the brim with home decorating and DIY tips!
Have Fun!
Cheryl
Artzy Fartzy Creations. Oh Yes you can DIY!
How to Whitelist Your Emails
Have you ever sat there waiting for an email someone [...]
Good Words-Bad Words – Words NOT to Say on Your Social Media
Did you know that there are certain words and phrases [...]
Stop Wearing All the Hats and Find Qualified People to Help
Are you wearing all the hats in your [...]
5 Money Saving Ways To Give Your Kitchen A Face-lift That Will SAVE You THOUSANDS of Dollars
A little paint can go a long way. [...]
3 Simple Strategies to Generate New Business!
We live in a fast pace world with [...]
How to Find Out What Social Media Platforms are Generating the Most Traffic for Your Business
Have you ever wondered what social media platforms [...]
Contents
Recent Reads
Limewash Brick: 1-Easy-Step for a Beautiful Home
DIY Limewash Finish for Exterior Brick Ready to learn how [...]
Whitewashing Furniture Made Simple
Want to learn a simple 2-step process for whitewashing furniture? [...]
Spectacular Furniture Woodgrain Finish on a Budget
Want to learn my secret to creating [...]


