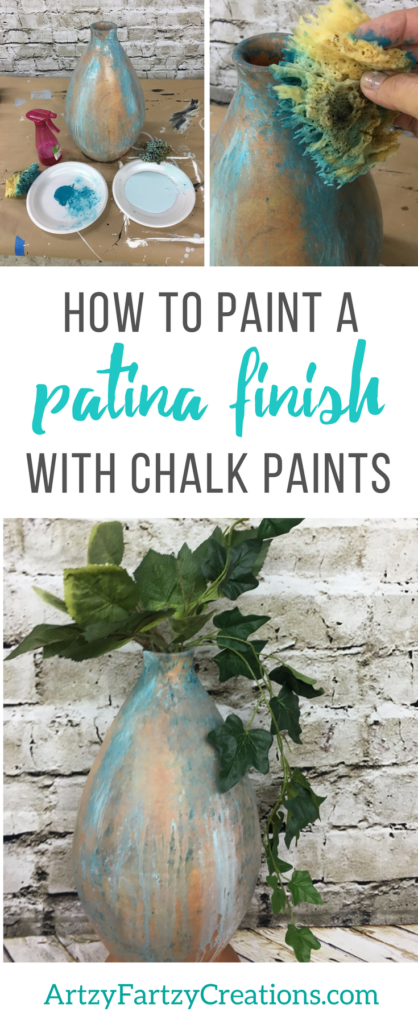
You don’t need any fancy products to create this beautiful Patina finish. I’m going to show you how you can make your own chalk paint and create this authentic-looking patina on anything.
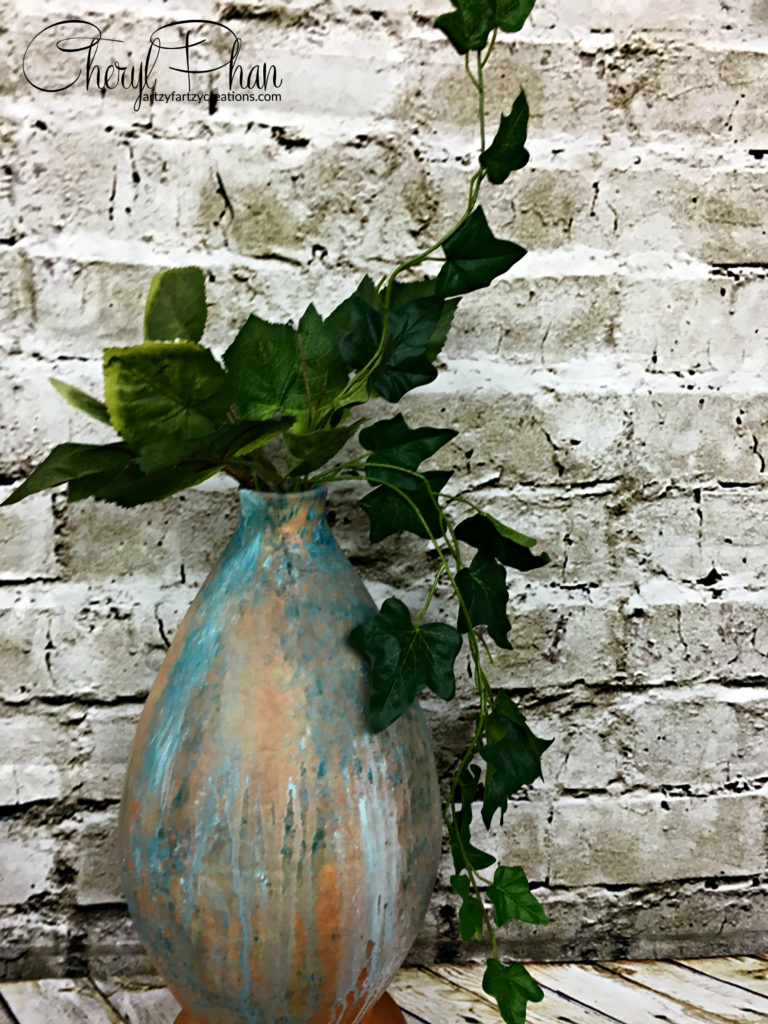
The patina finish is a technique that can be applied to various surfaces, and it’s a wonderful way to add character to your home decor. This technique mimics the natural aging process that metals and surfaces undergo over time. Imagine a vintage brass item that has developed a greenish hue due to oxidation; that’s the kind of look we’re aiming for with our project. By using chalk paints, you can achieve this finish easily and affordably.
Before you get started, let me show you how to make your own chalk type paint with this magic powder and save a ton of money.
Chalk paint is favored by many DIY enthusiasts because it adheres to just about any surface without the need for extensive preparation. You can use it on wood, metal, ceramic, and even fabric. This versatility is what makes it perfect for creating a patina finish. To give you an idea, let’s discuss a few examples of items you can transform with this technique, such as old furniture pieces, flower pots, or even picture frames. Each of these items can be revitalized with just a touch of creativity and some chalk paint.
Understanding the Art of Creating a Beautiful Patina
Understanding the fundamentals of creating a beautiful patina is essential for achieving the desired look. A successful patina finish requires layering and blending of colors in a way that mimics the natural weathering process. For instance, using a base coat of a darker color can simulate the underlying layers of age, while lighter colors can be used on top to represent the surface layer that has been worn away. Experimenting with different color combinations can yield unique results, so don’t hesitate to test out various shades on scrap materials before committing to your final piece.
WATCH THIS VIDEO: How to make your own chalk paint
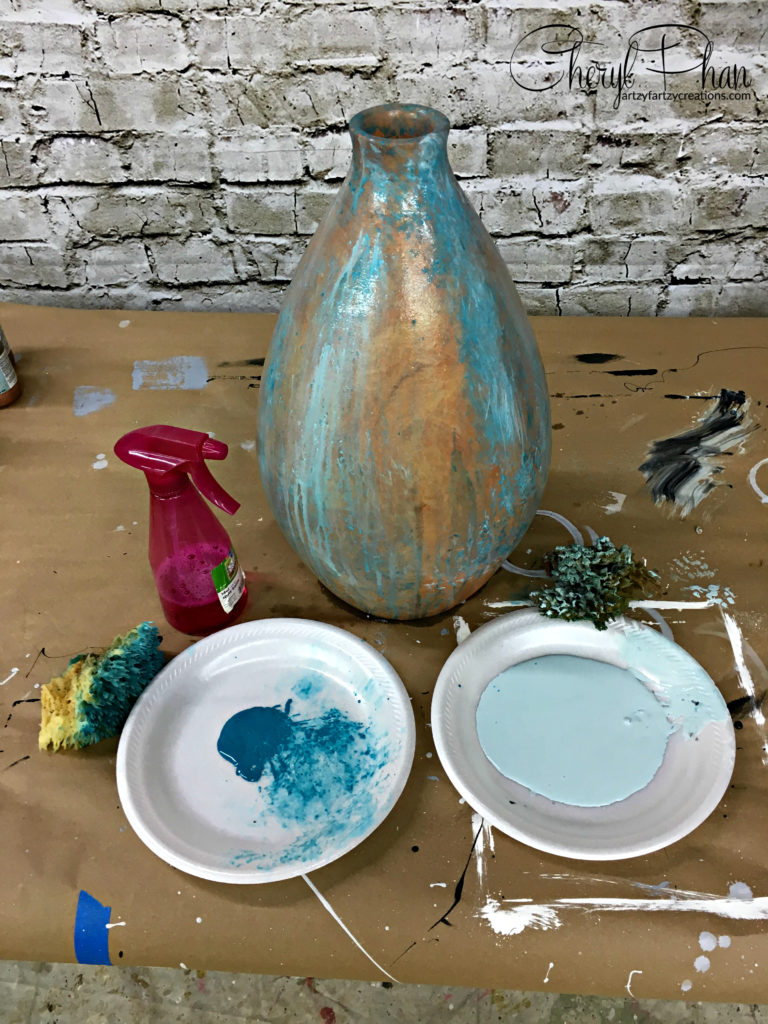
I started out with only two colors. To make your Patina look authentic, use green or blue colors. I use a deep teal and a light blue. I mixed it with the magic powder and poured it on two separate paper plates. You don’t need much paint. I made ¼ cup for each to do this vase and still had some left over.
When selecting your colors, consider the overall theme of your space. If your home features a coastal aesthetic, shades of blue and green will harmonize beautifully. For a more rustic look, earthy tones like brown and moss green can create an inviting atmosphere. Additionally, think about the finish of the paint you want to achieve—matte finishes tend to look more authentic for a patina effect than glossy finishes.
This literally took me 10 minutes to finish this project. It’s so easy a 10-year-old could do this. In fact, this would be a great project for the kiddos this summer.
Not only is this project easy and quick, but it also provides an excellent opportunity for family bonding. Involving children in art projects can foster creativity and boost their confidence. Consider hosting a crafting day where each family member has the chance to create their own unique patina item. This can lead to fun discussions about art, design, and personal expression as everyone chooses their colors and patterns.
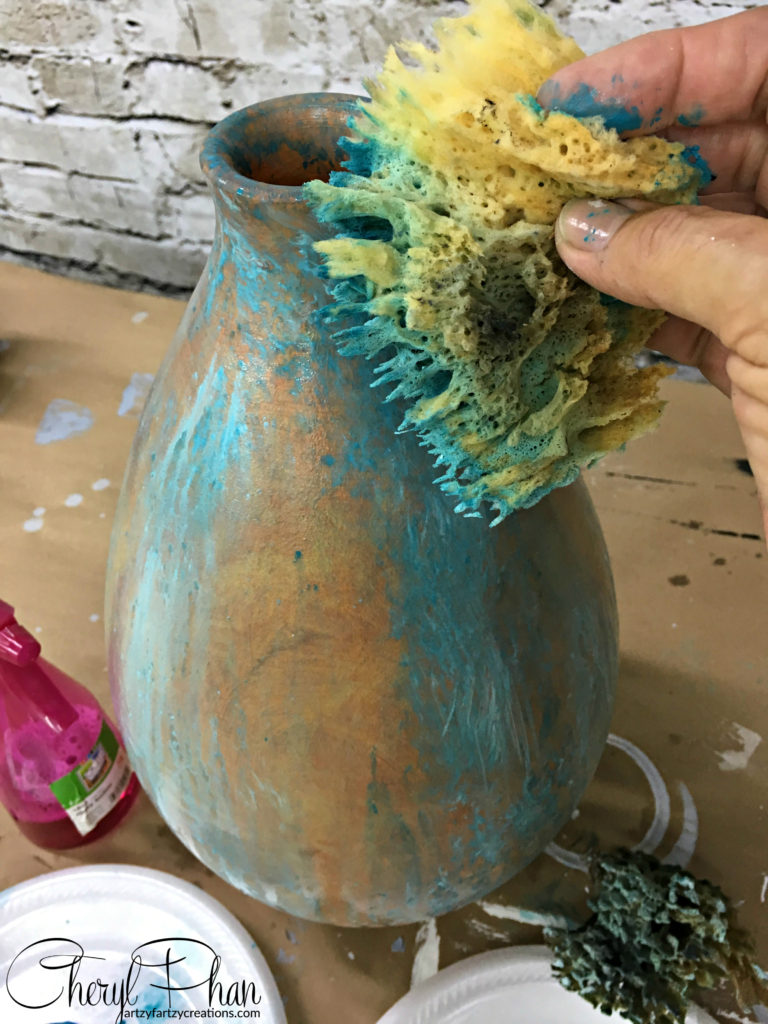
Here’s what you need a sea sponge and a spray bottle with water. Rip a small piece of the sponge, get it wet and wring out the water. This will make the fingers soft. Next, lightly dab the sponge in one of your colors and dab it on the vase. Lightly mist it as you apply the chalk type paint. Not to much or it will wash off. Go back and forth with the colors until they start to blend together. It’s OK if it’s runny. That’s what gives it that patina look. Make sure you leave some area open so you can see the background of the vase.
Using a sea sponge is just one method; you can also experiment with brushes or even your fingers for different textures. Each tool can produce varying results, and part of the fun is discovering which technique gives you the look you want. For instance, a brush might give you a more controlled application, while a sponge allows for more texture and blending. Don’t be afraid to mix these methods to see what works best for your project.

As you dab the sponge, focus on creating depth by layering colors. Start with the darker color as a base and gradually add lighter shades. This layering technique is crucial to achieving an authentic patina finish. You might also want to introduce a metallic paint for added dimension—this can mimic the sheen of aged metals perfectly.
If you want to learn how to start making money with your hobby, get the details HERE
For those interested in turning this hobby into a business, think about hosting workshops or classes. Sharing your knowledge of creating a patina finish can inspire others and create a community of DIY enthusiasts. Not only can you teach techniques, but you can also discuss sourcing materials and pricing for your finished products.
If you want to learn DIY Tricks and Tips, get my weekly blog HERE
By exploring different projects and sharing your techniques, you can build a following and perhaps even sell your creations online. Platforms like Etsy are great for showcasing hand-painted home decor items. As you grow your skills, consider branching out into other techniques that complement your patina finish, such as distressing or stenciling.
HAPPY PAINTING
Once you’ve completed your project, consider sealing your patina finish for added durability. A clear wax or matte sealer can protect your work while keeping the look authentic. Remember that the final touch can make a huge difference in the longevity of your patina finish. Ensuring protections against scratches and moisture will help maintain that beautiful look for years to come.

Artzy Fartzy Creations. Oh Yes you can DIY!

Polycrylic vs Polyurethane: Clear Coat Comparison
Polycrylic vs Polyurethane clear coat — choosing between these two [...]

Best Cordless Spray Gun Ever: My Go-To Painting Tool for a Smooth, Flawless Finish
Cordless paint spray gun lovers, this one’s for [...]

How to Start a Creative Business Online with Excellence
How to Start a Creative Business Online Woman painting [...]

Best Way to Clean Oil Paint Brushes and Keep Bristles Soft
How to Clean Oil Paint Brushes the Right [...]

Quick Fix: How to Repair a Cracked Tile Floor (Without Replacing Everything)
How to Repair a Tile Floor and Make [...]
How to Create Budget-Friendly Stenciled Door Panels That Look Custom and High-End
DIY Textured Stencil Design – Door Tutorial Want to transform [...]
Contents
Recent Reads

1 Best Seller- How to Live a Purpose-Driven Life Using the Talents You Already Have
Living a Purpose-Driven Life by Using Your God-Given [...]

How to Create a Buffalo Plaid Painting Technique (That Looks High-End but Is Totally DIY)
Buffalo plaid painting technique showing layered [...]

How to Paint a Concrete Porch Floor with a Gold Metallic Border (Step-by-Step DIY Guide)
If you’ve been Googling how to paint a concrete [...]