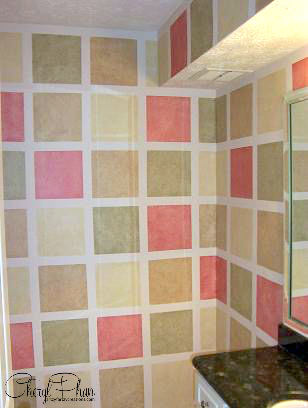
Sometimes my best ideas just come randomly. I needed to create a design for a hair salon but we were on a budget. Usually, when that happens I go to the studio and look through supplies and left-over paint for some inspiration.
I love coming up with crazy one-of-a-kind ideas and this was one of them. The technique I used was a simple rag of the effect and about six different color matte and metallic paints. You can find the step-by-step instructions in my book How to Faux Finish Using Common Household Items.
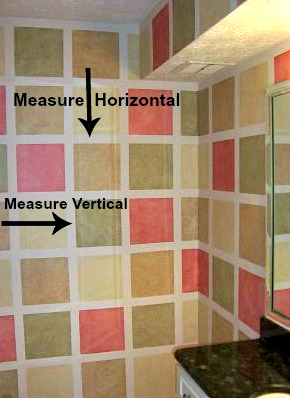
To create this look you will need to measure the room vertically and horizontally in inches. This will determine how many squares you will end up with. I just decided how big I wanted the squares and divided it into the total inches around the room.
The easiest way to do that is to apply the tape vertically first then horizontally. I used a 1” blue tape on this project. Don’t forget to keep the width of the tape in mind when you’re measuring. This way all your squares will be the same.
Taping was the most time-consuming part of this project. I think it took me about 6 hours just to tape. UGH! Do not despair, after you have all the tape up it goes fast.
Mix all your colors with 4 parts glaze to one part paint in separate bowls. Then randomly start rolling on a paint color to a square with a 6’ roller. Immediately start dabbing a wrinkled-up cotton rag onto the glaze mixture to remove some of the paint. This technique is called “Rag Off” The more you remove the lighter it will be. Keep applying different color paints to the squares until you are done with the room. Remove the tape when you are completely done.
PAINTING TIPS:
- Do one square at a time.
- Remove the glaze as soon as your done applying it
- Use a different roller for each color
- Make sure the tape is pressed onto the wall, if not the paint could bleed through
- Pay attention to the adjacent colors so you don’t have the same color next to one another.
Follow the directions in the ebook (Note, there are 5 other finishes in the book you may like as well – that’s only $1 per finish to learn!
If you want to learn how to start making money with your hobby get the details HERE
If you want to learn DIY Tricks and Tips get my weekly blog HERE
HAPPY PAINTING


Artzy Fartzy Creations. Oh Yes you can DIY!

What Can You Deduct on Your Taxes If You’re Self Employed?
Are you taking advantage of your tax write-offs? [...]

CYA-Cover Your Ass-sets
5 Important Tips to Protect Your Business from [...]

6 Thrift Store Finds You Can Transform To Decorate Your Home
Budget-friendly ways to transform your thrift store finds [...]

Learn how to paint Glitter office accessories in less than 3 minutes for as little as $12
Making your own glitter office accessories After searching [...]

Build a Custom Office Desk to Suit Your Individual Style
When you work from home, having a comfortable and pretty [...]

3 Fast and Easy Ways to Invite People to like your Facebook page
Increasing your Likes on your Business Facebook page [...]
Contents
Recent Reads
A Budget-Friendly Luxury Bedroom Makeover
The Affordable Elegance Quest of a Luxury Bedroom Makeover In [...]

Mastering Social Media
Trying to manage multiple social media platforms can be time-consuming [...]
Faux Granite Painting: DIY Kitchen Countertop Makeover
Introduction to Faux Granite Painting Faux granite painting offers a [...]