Best Sponge Painting Wall Technique for a Soft, Elegant Finish
There’s a certain kind of wall that makes people pause without even realizing why. It’s not bold. It’s not busy. But it has depth… softness… a quiet kind of elegance that feels intentional.
That look? It’s not as complicated as it seems.
The Sponge Painting Wall Technique that instantly elevates a space—without expensive materials or complicated tools. And once you understand how it works, it opens the door to creating custom finishes that feel completely one-of-a-kind.
Let me walk you through it like I would if we were standing in the room together, paint in hand.
Why the Sea Sponge Faux Finish Technique Works So Well

Flat paint does its job—but it doesn’t say much. A sponge finish adds subtle variation, which gives your wall movement and life.
Instead of one flat color, you’re layering tones. That layering mimics finishes like plaster, stone, or suede—without the cost or complexity.
The Beauty of This Technique
- It creates depth without heaviness
- It’s soft and forgiving (no harsh lines)
- It works in both modern and traditional spaces
- It instantly makes a room feel more custom
Designers often rely on texture to add interest without overwhelming a space. This technique does exactly that.
What You Need for Sponge Painting a Wall
You don’t need a long shopping list—just the right essentials.
Basic Supplies for a Sea Sponge Faux Finish
- Natural sea sponge (this matters—skip the synthetic ones)
- Base coat paint (eggshell works beautifully), any hardware store
- Paint for glazing (any hardware store)
- Glaze
- Paint tray
- Painter’s tape
- Drop cloths
- Gloves (optional, but helpful)
Choosing the Right Colors
This is where the magic really happens.
For a soft, high-end look, keep your colors close in tone. You’re building layers—not contrast. When looking at a fan deck, look at colors that are 2 shades apart. If they are to close in color, you may not see a difference.
Think:
- Blush + warm rose
- Cream + soft beige
- Pale gray + white
The closer the tones, the more elegant the finish.
Step-by-Step: How to Faux Finish a Wall with a Sea Sponge
This is where it all comes together—and I promise, it’s simpler than you expect.
Step 1 – Prepare Your Surface

Start with a clean, smooth wall. Wipe away dust and make sure there are no rough spots.
Tape off, that they have to do. trim and protect your floors. A little prep here makes everything easier later.
Step 2 – Apply Your Base Coat
Roll on your base color evenly and let it dry completely.
This layer sets the tone for everything that follows, so give it the time it needs.
Step 3 – Mix Your Glaze or Top Color
If you’re using glaze, mix:
- 1 part paint
- 3-4 parts glaze
This creates a translucent layer that allows the base coat to show through—key for that soft, dimensional look. You will be using more glaze than paint, so only buy a quart of the colors you will be mixing.
Step 4 – Load the Sponge Lightly
Dip your sea sponge into the mixture, then blot off the excess.
You want it slightly damp—not saturated.
Step 5 – Begin Dabbing the Wall

Gently press the sponge onto the wall and lift it straight off.
No dragging. No overthinking.
Work in a loose, random pattern, rotating the sponge as you go so the texture never repeats.
Step 6 – Blend as You Go
If an area feels too heavy, go back over it lightly with the base color
This softens everything and keeps the finish looking natural.
Professional Tips to Elevate Your Sponge Finish
This is where the difference between “nice” and “wow” really happens.
Rotate Your Sponge Constantly
Using the same side creates patterns—and patterns make it look less natural.
Turn the sponge often to keep the texture organic.
Work in Small Sections
Focus on areas about 2–3 feet wide at a time. This gives you control and keeps your blending consistent.
Step Back and Look
It’s easy to get caught up in the details up close.
Every few minutes, step back. The bigger picture is what matters most.
To create more depth, add a 3rd color.
Make a sample before first, so you get the hang of it, and to make sure the colors work together.
Where This Technique Really Shines
Once you try this, you’ll start seeing opportunities everywhere.
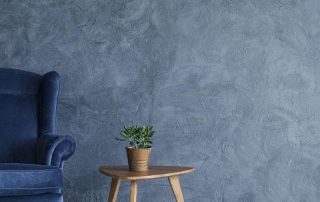
Bedrooms
Soft textures like the one in the image above create a calming, cozy atmosphere.
Accent Walls
Perfect for adding interest without overwhelming the entire room.
Bathrooms
Pair soft neutrals with good lighting, and you get that spa-like feel.
Furniture and Cabinets
Yes—this technique works beautifully beyond walls too.
The end Results

Here’s the truth most people don’t realize…
Luxury finishes aren’t always about expensive materials. They’re about layering, depth, and subtle variation.
A sea sponge faux finish checks all three boxes.
It softens light, adds dimension, and makes a space feel thoughtfully designed—even if you did it yourself.
Now you know exactly how to faux finish a wall with a sea sponge—from choosing colors to mastering the technique.
And the best part? You don’t need perfection to make it beautiful. This method works with you, not against you.
So here’s your next step:
Pick a wall.
Pick your colors.
And just start.
You might be surprised how quickly it comes together.
Want More Ideas Like This Delivered to You Every Week?
I share simple techniques, creative ideas, and real-world tips to help you create beautiful spaces—without overcomplicating the process.
✨ Join my weekly blog and get new tutorials, inspiration, and insider tips sent straight to your inbox.
Because once you learn how to create finishes like this…
You’ll never settle for flat walls again.
Happy Painting,
Cheryl,


Artzy Fartzy Creations. Oh Yes you can DIY!

One Step Glazing Technique for Textured Walls That Makes Your Home Look Expensive
One Step Glazing Technique Textured for Walls: Easy Faux Finish [...]

How to Decoupage Furniture with Napkins: Step-by-Step Process
How to Decoupage Furniture with Napkins: Easy Step-by-Step Guide for [...]

#1 Way to Prevent Paint Bleed-Through on Denim Jackets
How to Prevent paint bleed through denim jackets If you’ve [...]

How to Paint a Checkered Pattern on Tile (Makenzie Childs Inspired)
How to Paint Checkered Pattern on Tile: Step-by-Step [...]

Best roller for painting cabinets
If you’ve ever stood in the paint aisle [...]
Contents
Recent Reads

How to Decoupage Furniture with Napkins: Step-by-Step Process
How to Decoupage Furniture with Napkins: Easy Step-by-Step Guide for [...]

#1 Way to Prevent Paint Bleed-Through on Denim Jackets
How to Prevent paint bleed through denim jackets If you’ve [...]

How to Paint a Checkered Pattern on Tile (Makenzie Childs Inspired)
How to Paint Checkered Pattern on Tile: Step-by-Step [...]