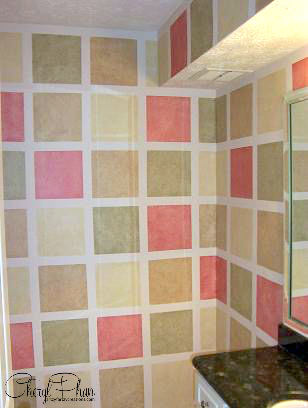
Sometimes my best ideas just come randomly. I needed to create a design for a hair salon but we were on a budget. Usually, when that happens I go to the studio and look through supplies and left-over paint for some inspiration.
I love coming up with crazy one-of-a-kind ideas and this was one of them. The technique I used was a simple rag of the effect and about six different color matte and metallic paints. You can find the step-by-step instructions in my book How to Faux Finish Using Common Household Items.
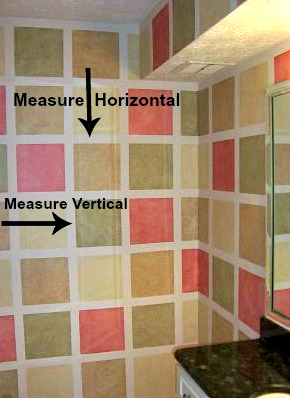
To create this look you will need to measure the room vertically and horizontally in inches. This will determine how many squares you will end up with. I just decided how big I wanted the squares and divided it into the total inches around the room.
The easiest way to do that is to apply the tape vertically first then horizontally. I used a 1” blue tape on this project. Don’t forget to keep the width of the tape in mind when you’re measuring. This way all your squares will be the same.
Taping was the most time-consuming part of this project. I think it took me about 6 hours just to tape. UGH! Do not despair, after you have all the tape up it goes fast.
Mix all your colors with 4 parts glaze to one part paint in separate bowls. Then randomly start rolling on a paint color to a square with a 6’ roller. Immediately start dabbing a wrinkled-up cotton rag onto the glaze mixture to remove some of the paint. This technique is called “Rag Off” The more you remove the lighter it will be. Keep applying different color paints to the squares until you are done with the room. Remove the tape when you are completely done.
PAINTING TIPS:
- Do one square at a time.
- Remove the glaze as soon as your done applying it
- Use a different roller for each color
- Make sure the tape is pressed onto the wall, if not the paint could bleed through
- Pay attention to the adjacent colors so you don’t have the same color next to one another.
Follow the directions in the ebook (Note, there are 5 other finishes in the book you may like as well – that’s only $1 per finish to learn!
If you want to learn how to start making money with your hobby get the details HERE
If you want to learn DIY Tricks and Tips get my weekly blog HERE
HAPPY PAINTING

Artzy Fartzy Creations. Oh Yes you can DIY!

Polycrylic vs Polyurethane: Clear Coat Comparison
Polycrylic vs Polyurethane clear coat — choosing between these two [...]

Best Cordless Spray Gun Ever: My Go-To Painting Tool for a Smooth, Flawless Finish
Cordless paint spray gun lovers, this one’s for [...]

How to Start a Creative Business Online with Excellence
How to Start a Creative Business Online Woman painting [...]

Best Way to Clean Oil Paint Brushes and Keep Bristles Soft
How to Clean Oil Paint Brushes the Right [...]

Quick Fix: How to Repair a Cracked Tile Floor (Without Replacing Everything)
How to Repair a Tile Floor and Make [...]
How to Create Budget-Friendly Stenciled Door Panels That Look Custom and High-End
DIY Textured Stencil Design – Door Tutorial Want to transform [...]
Contents
Recent Reads

1 Best Seller- How to Live a Purpose-Driven Life Using the Talents You Already Have
Living a Purpose-Driven Life by Using Your God-Given [...]

How to Create a Buffalo Plaid Painting Technique (That Looks High-End but Is Totally DIY)
Buffalo plaid painting technique showing layered [...]

How to Paint a Concrete Porch Floor with a Gold Metallic Border (Step-by-Step DIY Guide)
If you’ve been Googling how to paint a concrete [...]