YES! This is paint…. Can you believe it?

If you have outdated tile in your bathroom, kitchen, laundry room, porch, or anywhere in your home, and you want to update it without the demolition, you’re going to love this post. I’m going to teach you how the professionals transform old tile to look fresh and new.

This is the old tile on my porch. It was still in good condition, but the style and color were outdated. So, instead of ripping it out it was more cost-effective to paint it.

The first step is to use a sander and sand the tile with 60 grit sandpaper. This step is important. Sanding the tile gives the tile (tooth) so that the primer will stick.
After sanding the floor, clean it with TSP.

Next, prime the floor with an oil-based primer. It’s best to apply two coats. Make sure you don’t paint yourself into a corner. Let dry 4-6 hours.

Paint the floor with two coats of floor paint. Let it dry overnight. This can be any color you choose.
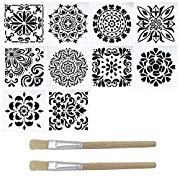
There are many different stencil designs to choose from. Make sure you order the correct size. Measure your tile before ordering the stencil. You will also need a stencil brush.

Tape the stencil to the tile. You can use just about any paint for the stenciling. I would suggest a flat or matte-type paint. Latex or acrylic. Go here to learn how to stencil the correct way.

For the last step, you need to apply 3-4 coats of sealer. This will protect the floor from everyday use. Let each coat dry per manufacturer’s instructions.

Check this out. A beautiful new floor. Without the demolition, mess, and expense.
If you enjoyed this blog, please follow me on Facebook where I share my DIY tips and resources.
Would you like to learn how to turn your hobby into a business, but you struggle with social media and need help? Come join me in my monthly coaching group “Empowering Women” I’ll teach you all my shortcuts.
XO
Cheryl

Artzy Fartzy Creations. Oh Yes you can DIY!
5 Pro Prep Secrets That Make or Break Any Faux Finish (Don’t Skip These!)
Let me let you in on a little [...]
My First Furniture Painting Mistake (And What I’d Do Differently Now)
If you’ve ever picked up a paintbrush, looked at a [...]
1 Best Seller- How to Live a Purpose-Driven Life Using the Talents You Already Have
Living a Purpose-Driven Life by Using Your God-Given [...]
How to Create a Buffalo Plaid Painting Technique (That Looks High-End but Is Totally DIY)
Buffalo plaid painting technique showing layered [...]
How to Paint a Concrete Porch Floor with a Gold Metallic Border (Step-by-Step DIY Guide)
If you’ve been Googling how to paint a concrete [...]
Contents
Recent Reads
My First Furniture Painting Mistake (And What I’d Do Differently Now)
If you’ve ever picked up a paintbrush, looked at a [...]
1 Best Seller- How to Live a Purpose-Driven Life Using the Talents You Already Have
Living a Purpose-Driven Life by Using Your God-Given [...]


